
NOTE: It is highly advisable that you send a test file to an end client to ensure that their network can accept files. Depending on the end user network security and privileges , there may be a couple settings that need to be adjusted prior to being able to receive files.
Welcome to the Capsule Media Highspeed file transfer system powered by FileCatalyst.
If you’re having issues uploading/downloading or sending files with FileCatalyst, please refer to the FileCatalyst Troubleshooting Guide for support.
Although the FileCatalyst TransferAgent is ultimately the tool which performs and manages file transfers, the main interactions occur through an HTML5 Web User Interface.
STEP 1 – Logging In
The first step is to visit the Capsule Media Highspeed file transfer system powered by FileCatalyst. You can access this directly or through the CapsulePRO Upload/Email/Download button at the top of the screen in CapsulePRO or directly by going to https://transfer.capsulemedia.com:12480/ta/link/welcome.html
STEP 2 – Upload or Download Files
Click on the Upload Button. Once you do that, you’ll be prompted to launch the FileCatalyst Transfer Agent. If you haven’t already installed it, you can follow the steps at:
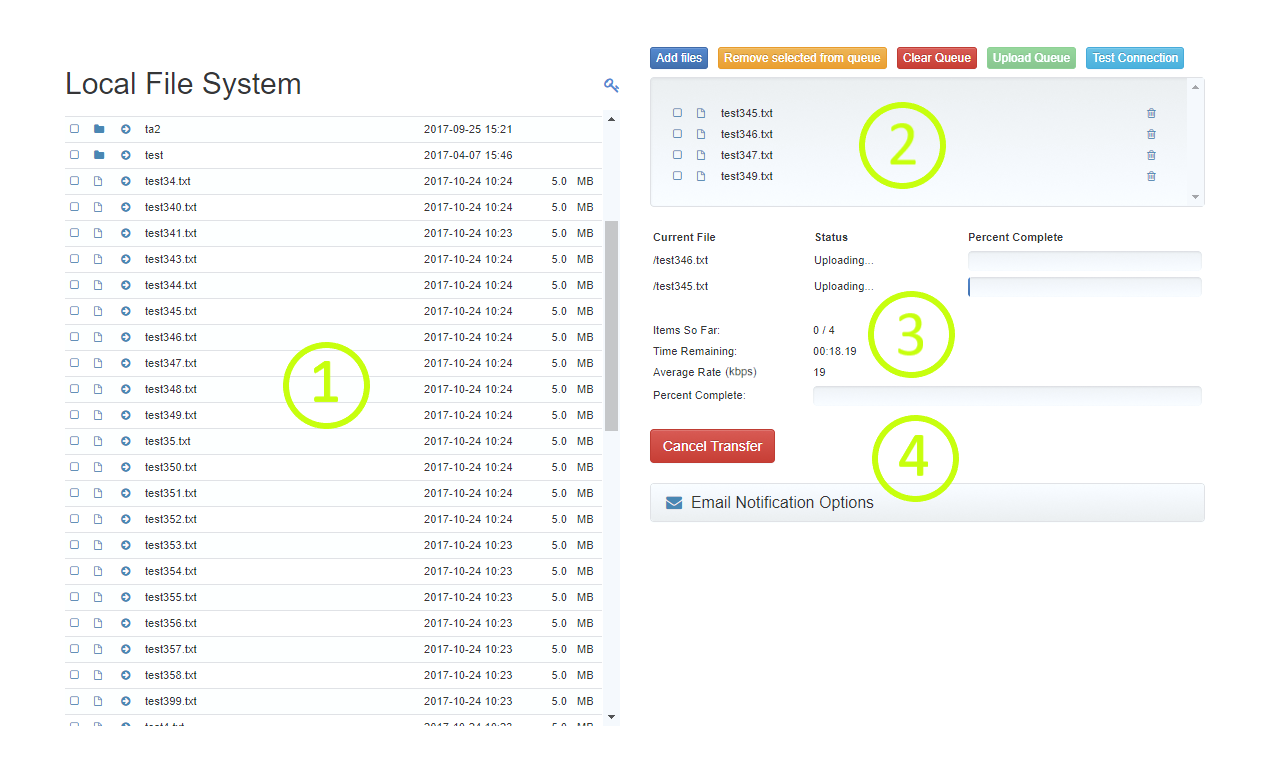
1 – Browse Area
Either the local or remote filesystem may be made available for navigation. Standard browsing conventions are used, such as the ability to sort by Name, Last Modified, or Size. Clicking on a directory icon or directory name will navigate one level deeper. Clicking the “add” icon (a right-arrow in this example) adds an individual item directly to a queue. Checkboxes allow selection of multiple items, which are added to the queue with the button found above the queue area.
2 – Queue Area
Files are added to the queue to make them eligible for transfer. The queue may be modified before sending by clicking the delete icon (here, a trash can symbol) or by using the checkboxes and clicking a “Remove selected” button. The “Add selected” will move checked files from the Browse Area into the queue. Finally, the file transfer (upload or download) is triggered with the appropriate button.
It is also possible test the connection against FileCatalyst Server using the “Test Connection” button. That is the same test that can be executed on TransferAgent Test Connections page.
3 – Status Area
View the progress of ongoing transfers. This area does not typically appear until after the transfer has started. During the transfer, a “Cancel Transfer” button is available. After the transfer, it either disappears (for uploads) or is replaced by an “Open Download Location” button (for downloads) which will open the destination directory on your local machine. “Open Download Location” button is not available when FileCatalyst TransferAgent is running as service.
4 – Email Notification Options
This area is not made available by all organizations. When it is, you may click to expand this area and enter the email address and a message for email recipients. At the completion of a transfer (whether successful or not), an email is sent to your recipients with your message. The administrator may also choose the email to be sent to any other email addresses with additional body text which you as an end user may not change.
STEP 3 – Email Link (Creation Of An Individual Link)
In an attempt to allow TransferAgent a simple and easy method to send files to others, FileCatalyst provides TransferAgent with the ability create an e-mail “link” that is sent out to a recipient list specified when the link is created.
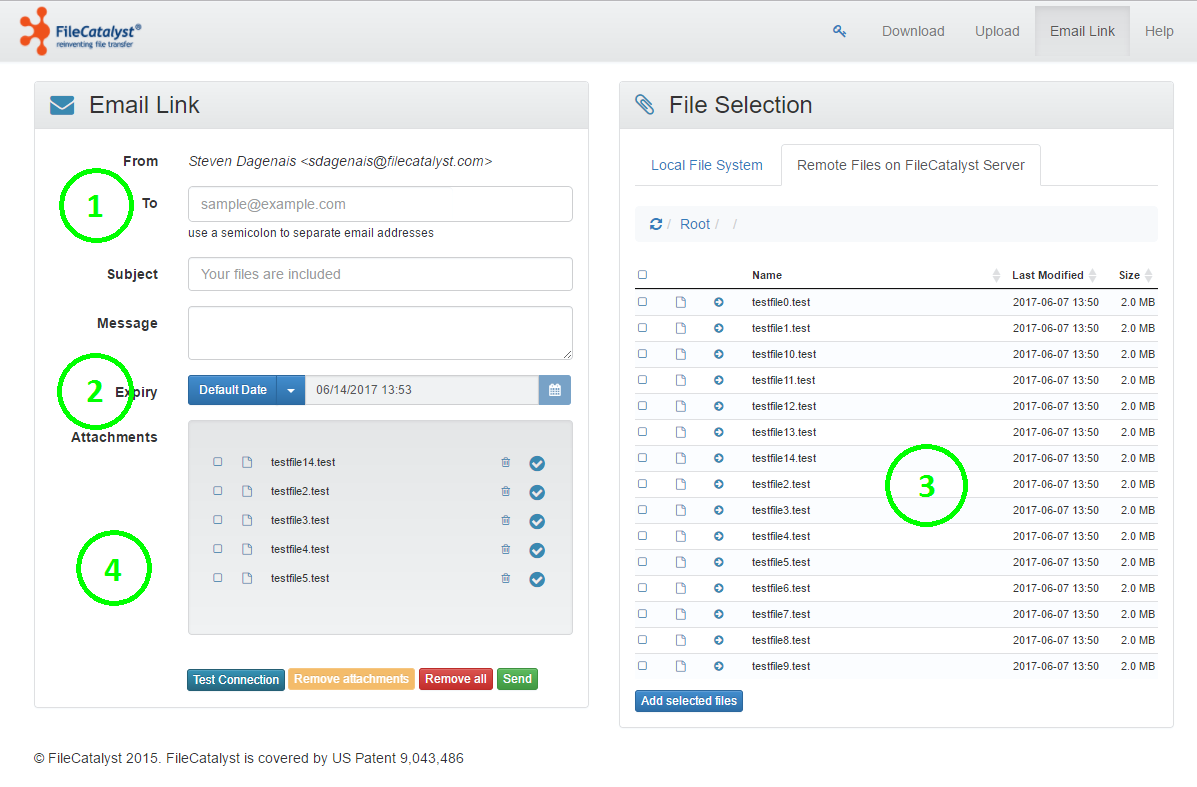
1 – Email Parameters
This section contains the mandatory fields that must be filled out during the creation of a link. These include a list of recipients in the “To” field, a subject for the link in the “Subject” field, and a message in the “Message” field. The message is your own note to the recipient, and is appended to auto-generated content.
When email links are single use, the “To” field can only accept a single email address.
It is also possible test the connection against FileCatalyst Server using the “Test Connection” button.
2 – Expiry Type
These fields allow the user to choose how and when the link will expire. The administrator will also have set an allowed range of dates that can be chosen as expiry dates for the link, if the default is not desirable. The available expiry types are as follows:
- Default Date: The link expires by the last date in the range of allowed expiry dates.
- Single Use: Any file included in the link will only be available to download once. This type may be the only selectable option if the administrator has limited the configurability of download links. Note: A link is considered to be downloaded when all files in the link have been downloaded. If one or more of the files in a link aren’t downloaded and the “Single Use” option is selected, the link will delete/expire as normal.
- Custom Date: The link will expire by the selected date. Only dates within the range of allowed expiry dates will be selectable. Note: The expiry date set by the administrator includes a time component. If the user selects a time which goes beyond that of the administrator, it will be ignored and the time will be set to the last allowed minute.
3 – Browse Area
Users can browse and select files from their local (their own machine) and remote (their FileCatalyst user account) file systems in order to select files to be sent in the link. Local files will be automatically uploaded upon selection, and remote files will simply be included within the link without any transfer needed. Users can toggle which file system they are currently browsing by clicking on the “Local File System” or “Remote Files On FileCatalyst Server” options that are available at the top of the browsing area.
Within this area, standard browsing conventions are used, such as the ability to sort by Name, Last Modified, or Size. Clicking on a directory icon or directory name will navigate one level deeper into the file system. Clicking the “add” icon (a right-arrow in this example) adds an individual item directly to the attachments area. Checkboxes allow selection of multiple items, which are added to the attachments list with the button found below the list area.
Note: Currently only files with unique names are supported when creating a link. If two files with the same name and extension are selected, one will overwrite the other on the recipient’s download. To work around this, the sending user must rename one of the files. Also, the file name is limited to 2000 characters.
4 – Attachments Area
This area contains all of the selected files. When the “Send” button is pressed and all transfers have finished, an email containing a link will be sent out to each designated recipient. The recipients can then open the email and click on the link inside. Upon clicking this link they will directed to a download page.